How to: Format Your 64GB or 128GB SD card (Windows PC + Apple Mac)Updated 6 hours ago
This guide will show you how to format your SD card using Windows PC or Apple Mac:
Windows -
In most cases, 64GB/128GB cards require formatting to FAT32 before they will work. This is done by connecting the SD card to your Mac Computer. We’ll go through the process in this guide.
There are a couple of recommendations we have when using 64GB/128GB cards.
- Use a Class 10 or Class 6 speed SD card.
- Use a reputable brand from a reputable seller. Coincidently we sell cards that have been tested with our equipment.
Don’t use a Class 4 SD card. They’ll probably be too slow and cause corruptions of your recordings.
If the card you’ve bought seems too cheap to be true, it’s probably a fake and won’t last very long, if it works at all. This is the most common cause for issues.
The first step in formatting the card is to connect the SD card to your PC. You can do this using the built in card reader if you have one. If the card can’t be inserted into your PC then you’ll need a dedicated card reader. There are a number of card readers available, make sure it’s compatible with SDXC/Micro SD cards.
Download the Software;
To format in FAT32 we first need to download some software to do the formatting for us. This software is called FAT32 Format, and can be downloaded from http://ridgecrop.co.uk/index.htm?guiformat.htm
Download the software, making sure you know where you are saving it, because we will need to open and close this software a couple of times. Once downloaded go ahead and open the software.
You might have noticed your version doesn’t have those coloured boxes. They’ve been put there so we can reference their contents.
Make sure you back up any data you have on your SD card as the following steps will delete the entire contents of the drive. Once you are ready to continue, if you haven’t already done so, unplug the SD card from your PC.
- Click on the drop down menu inside the Green box, and take a note of the letters listed in there, and then close the program.
- Now connect the SD card to your computer and re-open the software.
- Now click on the drop down menu inside the Green box, and you should notice a new letter has appeared. Go ahead and click this as it should be your SD card.
- Now in the Red box. You can name the SD card to make it easier to identify in the future, though this is optional, and it will format and function correctly without a name.
- Ensure there is a tick in the box highlighted by the Blue box. If there isn’t, click it with you mouse to add the tick.
- Now click the the Start button which is highlighted by the Orange box. You will then get a message box, asking you to confirm that you understand all data on this drive will be lost, this is your last chance to make sure nothing important is on the SD card. Click the ‘OK’ button to start the format.
You will then get a progress bar above the ‘Start’ button. Once this is full the format is complete, and you can close the software, and remove the SD card from your computer.
The SD card is now formatted in FAT32 and ready to be used. For information on how to insert your SD card, please see here
Apple Mac :
In most cases, 64GB/128GB cards require formatting to FAT32 before they will work. This is done by connecting the SD card to your Mac Computer. We’ll go through the process in this guide.
There are a couple of recommendations we have when using 64GB/128GB cards.
- Use a Class 10 or Class 6 speed SD card.
- Use a reputable brand from a reputable seller. Coincidently we sell cards that have been tested with our equipment.
Don’t use a Class 4 SD card. They’ll probably be too slow and cause corruptions of your recordings.
If the card you’ve bought seems too cheap to be true, it’s probably a fake and won’t last very long, if it works at all. This is the most common cause for issues.
The first step in formatting the card is to connect the SD card to your Mac. You can do this using the built in card reader if you have one. If the card can’t be inserted into a PC then you’ll need a dedicated card reader. There are a number of card readers available, make sure it’s compatible with SDXC/Micro SD cards.
Once the SD card is connected to your Mac you’ll need to open the Disk Utility. This is easily done by clicking the spotlight icon in the top right of your screen (or by pressing the keyboard shortcut cmd + spacebar) and searching for Disk Utility.
Click on Disk Utility to launch it and you’ll get something like this;
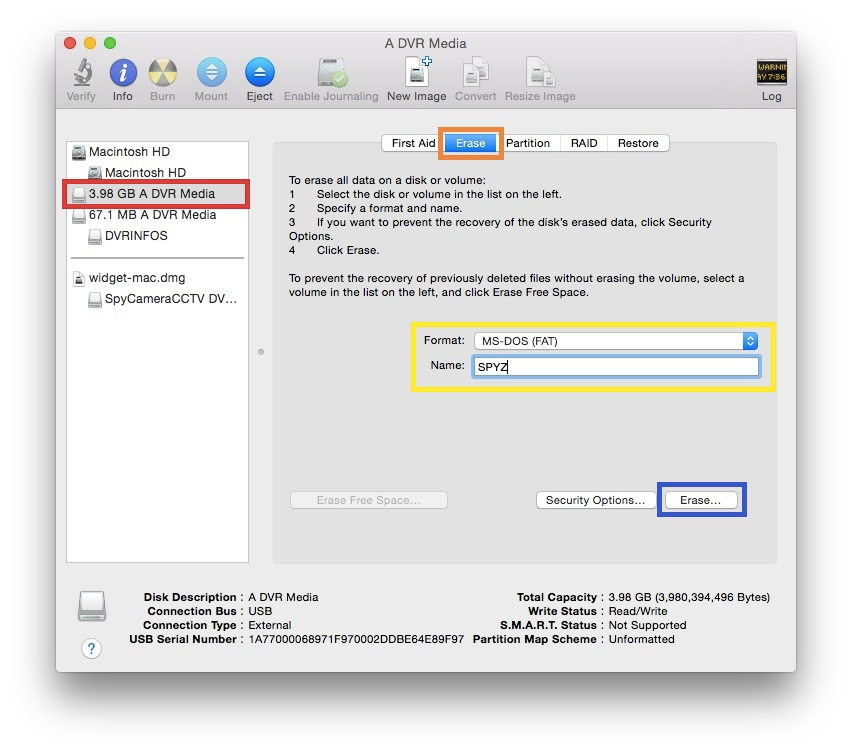
- First select the SD card from the list on the left hand side. In this example we’re formatting a 4GB card, but the process is identical for formatting larger cards. Be sure you’re selecting the correct drive.
- Next click the Erase option highlighted in the image above by a orange box.
- Now click the Format drop down and select MS-DOS (FAT). You can also add a name to make the card easier to identify in the future.
The final step will erase the entire contents of the SD card. Be sure you have the correct drive selected and that any required data from the SD card is backed up before proceeding.
Finally click the Erase… button to start the formatting process.
The SD card is now formatted in FAT32 and ready to be used. For information on how to insert your SD card, please see here
Need more help?
If you need help with anything else please check out our other guides or get in contact.